
How Can We Help?
Images optimizer
High-resolution photography, 3D interior renders, and architectural blueprints demand crisp visual details. By default, WordPress automatically compresses images when generating cropped thumbnails, reducing JPEG quality down to 90%. The Goarch theme provides a dedicated setting to override this default behavior and output images at maximum visual fidelity.
Step 1: Navigate to Optimization Options
To access the image quality settings:
- Log into your WordPress admin dashboard.
- Go to Theme Options > Optimizations in the left sidebar menu.
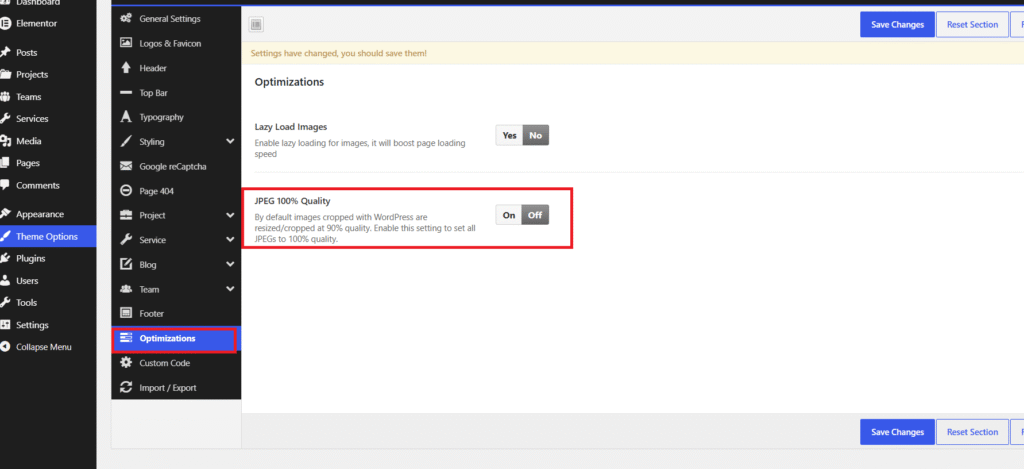
Step 2: Configure JPEG 100% Quality
In the Optimizations panel, locate the JPEG 100% Quality section:
- Default Behavior (Off): WordPress resizes and crops uploaded JPEGs at 90% quality to reduce file size. While this saves server bandwidth, subtle artifacts or blurriness may appear in complex architectural photography or thin line-art blueprints.
- Enabled (On): Sets the quality for all newly generated JPEG thumbnails and cropped image variations to 100% quality, preserving full sharpness and clarity.
To activate full image quality:
- Click the On button next to JPEG 100% Quality.
- Click Save Changes at the top right (or bottom right) of the panel to apply your settings.
When to Use 100% JPEG Quality
Recommended For:
- High-Detail Portfolios: Showcasing fine texture details in interior design renders, masonry, or wood grains.
- Technical Drawings & Diagrams: Preserving sharp lines in site plans, CAD exports, and floor plans.
- Large Hero Banners: Ensuring large full-width banner images remain crisp on 4K and Retina displays.
Performance Tip: Preserving 100% JPEG quality yields higher visual clarity but results in larger file sizes. To maintain optimal site performance, pre-compress your source image files or use web-optimized image formats prior to uploading them to your media library.