
How Can We Help?
Teams
The Teams custom post type in the Goarch theme provides a dedicated workflow engineered to showcase staff directories, corporate leadership tables, and studio design partners. Completely separate from standard blog posts and project entries, this specialized module gives you structured data fields to input professional credentials, licensing details, and direct contact avenues for your organization’s roster.
Feature Overview
- Dedicated Personnel Directories: Build comprehensive corporate profiles without cluttering your main blog archives or page templates.
- Granular Corporate Metadata: Utilize dedicated data layers built right into the dashboard to publish licenses, professional specialties, tax IDs, and direct emails.
- Organizational Taxonomy Structures: Classify your roster members under distinct office branches, design divisions, or regional hierarchy groups.
- Dynamic Profile Integration: Link high-quality headshots directly to clean template arrays via the WordPress core featured image framework.
Step-by-Step Instructions
Follow these steps to build, organize, and publish team profiles across your platform:
- Log in to your WordPress administrative workspace, navigate down the left menu sidebar, and select the Teams menu option.
- Select Categories if you need to establish explicit office branches or department groupings prior to adding staff members.
- Click Add New Team to pull open a fresh staff profile creation canvas.
- Input the team member’s full name directly within the main title field.
- Move down to the Team Member Details metadata area and fill out the text boxes (such as professional position, corporate license numbers, and email contacts).
- Upload a high-resolution, uniformly cropped staff headshot via the Set featured image link in the right-hand panel.
- Click Publish to send the profile live to your corporate index sheets.
Explanation of Settings
Teams Dashboard Index
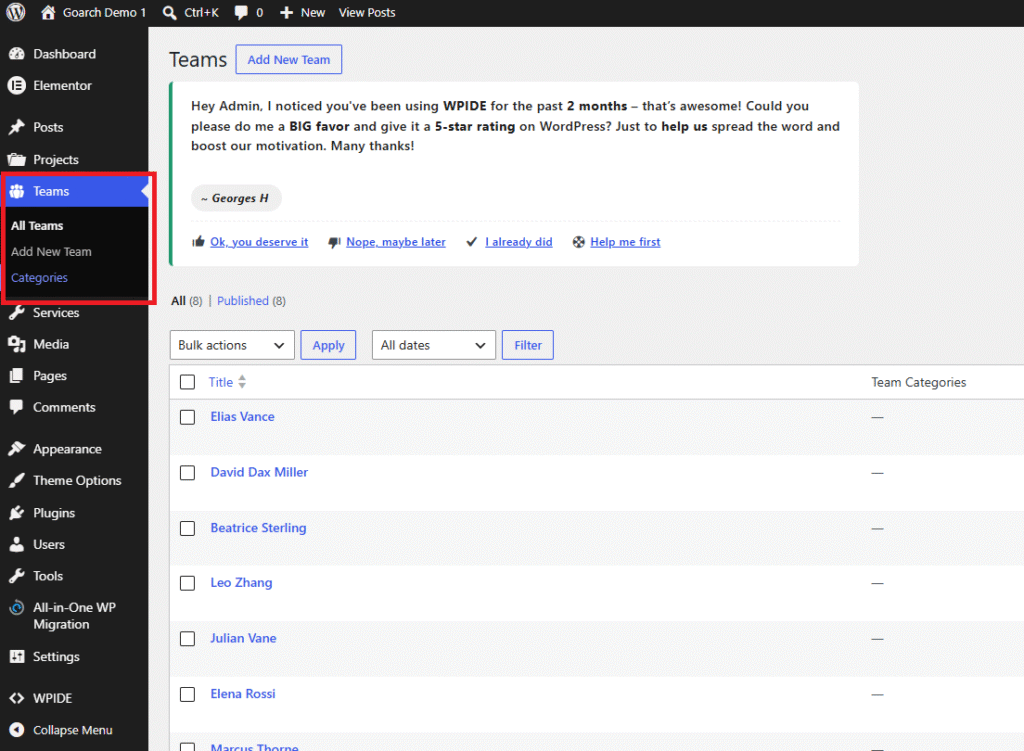
- All Teams: Launches the global workspace displaying every staff profile asset configured in your site. As visible in
image_2a9d02.png, this tracking node currently lists 8 published individuals (such as Elias Vance, David Dax Miller, and Beatrice Sterling). - Team Categories Column: Displays assigned office classification tags relative to each item row so you can ensure proper department placement at a glance.
Add New Team Profile Workspace
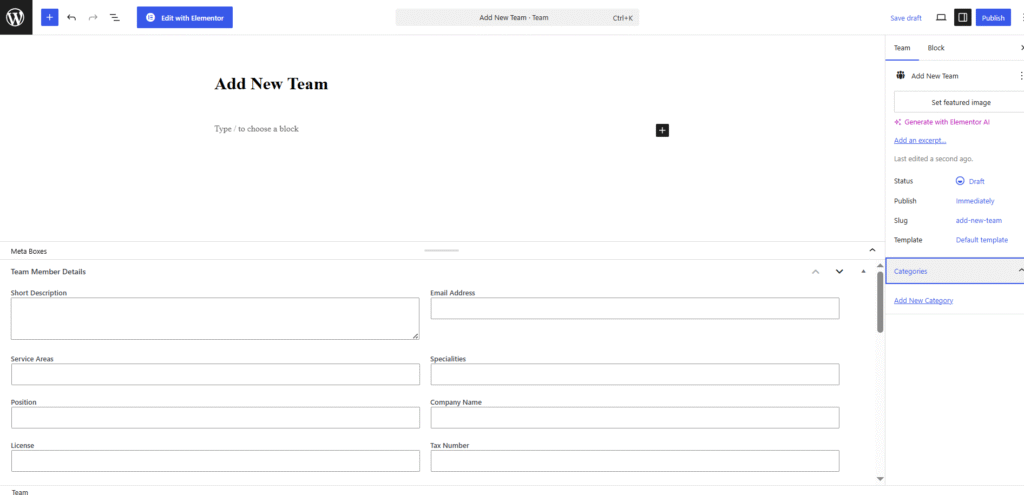
- Title Block: Define the primary entry name for your team member.
- Set Featured Image: Assign the core professional headshot asset. To ensure your dynamic team grid looks polished and uniform on the frontend, use consistent image proportions and background treatments across all profiles.
- Categories Selector Sidebar: Toggle target department filters or assign team members to specific workspace units.
Meta Boxes -> Team Member Details
This area houses structured metadata boxes crafted to display crisp corporate stats alongside a team member’s bio:
- Short Description: Enter a brief professional summary statement or career objective.
- Email Address: Provide a direct corporate email link for business inquiries.
- Service Areas: Detail the specific geographic regions or operational zones managed by this team member.
- Specialities: Highlight key architectural or technical skills (e.g., Sustainable Design, BIM Management, Interior Architecture).
- Position: Specify the official corporate job title (e.g., Principal Architect, Senior Project Engineer).
- Company Name: Input your firm’s designation or parent organization label.
- License: Add professional practice certifications, state credentials, or institutional membership numbers.
- Tax Number: Record corporate or internal tax identification metrics if required by local compliance directories.
Team Categories Screen
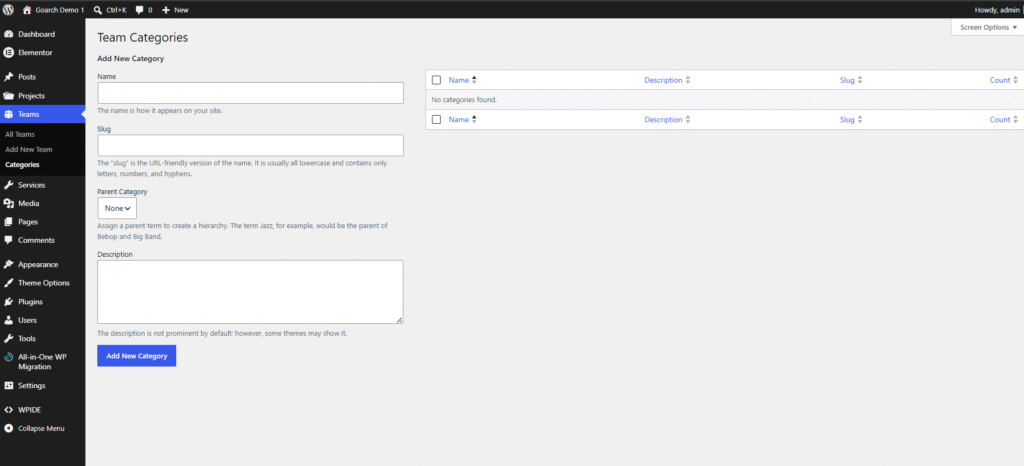
- Name: Set the public title for your team group or department layout track (e.g., Executive Board, Design Department, Project Managers).
- Slug: Specify the URL-friendly lowercase alternate structure path to navigate directly to group landing archives.
- Parent Category: Set up nested structural tiers if you need to organize sub-departments cleanly beneath primary corporate branches.
- Description: Add contextual notes clarifying the category group; depending on your layout settings, specific front-end summary widgets may display this text layer.
Tips & Best Practices
- Standardize Graphic Aspect Ratios: To keep front-end team grid matrices looking clean, balanced, and perfectly aligned, ensure all profile headshots uploaded via Set featured image share matching aspect ratios (such as a 1:1 square crop or a vertical 4:5 portait scale).
- Keep Contact Links Secure: When completing the Email Address metadata field under the Team Member Details configuration drawer, ensure you type a valid email format (
name@company.com) to protect front-end interaction triggers from mapping to broken or invalid hyperlink targets. - Use Clear, Parallel Roles: When defining your team taxonomy properties, use descriptive titles within the Position box. Keeping nomenclature uniform across equivalent roles guarantees a clean hierarchy when your roster items are sorted inside Elementor layout components.
Troubleshooting
Team profiles display on the live site but miss position titles or email links
This generally indicates empty entry fields in your metadata panels. Open the specific team member’s entry from your All Teams dashboard index (image_2a9d02.png), scroll down below the main layout window to the Team Member Details module (image_2a9d57.png), and verify that fields like Position, Specialities, or Email Address are filled in completely rather than left blank.
Newly added team departments do not appear on your front-end filters
This behavior occurs when a department has no profiles assigned to it. As demonstrated on the right side of the Team Categories screen (image_2aa044.png), fresh classifications display an initial count of 0. To fix this and make the department category visible on front-end team feeds, assign at least one staff profile to your new category inside the right-hand panel of the profile editor.