
How Can We Help?
Common Installation Error
In this guide, we will highlight some of the most common errors folks run into when installing the Goarch theme for the first time.
Before you start: Are you using WordPress.com? Standard WordPress.com plans do not allow you to upload custom theme files. To install and run Goarch, you will need a self-hosted installation of WordPress (WordPress.org).
Downloading the Correct Theme Zip File
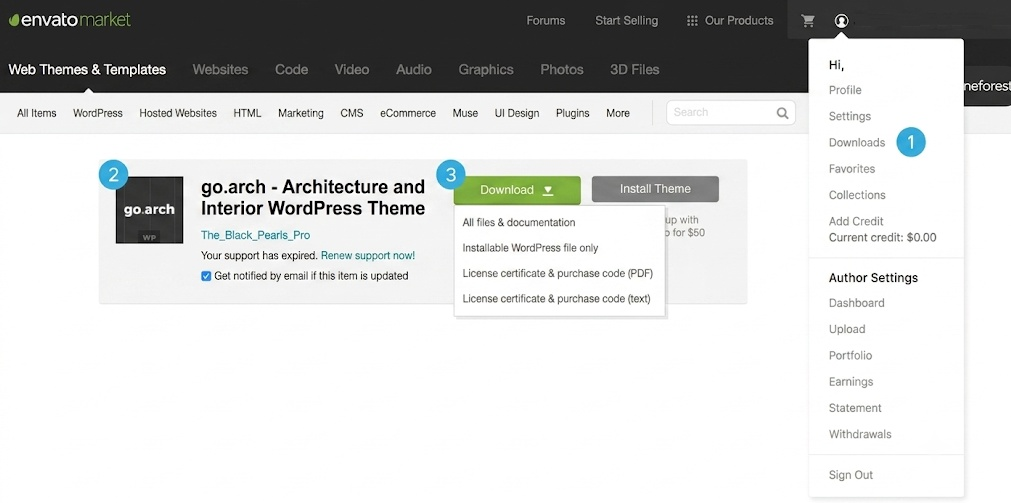
When downloading your purchase from ThemeForest / Envato Market, make sure you select the “Installable WordPress file only” option.
If you select “All files & documentation” by mistake, attempting to upload that main downloaded archive into WordPress as-is will fail. If you accidentally downloaded the full package, unzip it on your computer and locate the internal goarch.zip installable theme file.
Zip File Won’t Download / Auto-Extracting
It is possible your web browser or operating system is configured to automatically unzip files upon completion of a download (common with Safari on macOS).
WordPress requires a compressed .zip archive—you cannot upload an uncompressed regular folder directly through the dashboard. If your computer automatically unzips the download, locate the folder, right-click it, and select Compress (or Send to > Compressed (zipped) folder) before attempting to install it in WordPress.
How to Upload and Install Goarch
- Log into your WordPress admin dashboard and make sure WordPress is updated to the latest version. (While this may not directly stop a theme from installing, keeping core software updated is a vital security best practice.)
- Navigate to Appearance > Themes and click the Add New button at the top of the screen.
- Click the Upload Theme button.
- Click Choose File (or Browse…) and select the
goarch.zipfile you downloaded. - Click Install Now and wait a moment for the server to process the upload.
- Once the package is uncompressed and installed successfully, click Activate.
Common Problems & Solutions
1. Problem: “The package could not be installed. The theme is missing the style.css stylesheet.”
If you click Install Now and see an error stating “The package could not be installed. The theme is missing the style.css stylesheet,” you have uploaded the full ThemeForest package archive rather than the standalone theme file.
Solution:
- Log into ThemeForest / Envato Market.
- Click on your account profile icon in the top-right menu and select Downloads (Marker 1 in
the above image). - Locate go.arch – Architecture and Interior WordPress Theme in your list of purchases (Marker 2).
- Click the green Download button (Marker 3) and select “Installable WordPress file only”.
- Return to your WordPress site and upload the newly downloaded
.zipfile.
2. Problem: “Are you sure you want to do this?”
After browsing for your theme file and clicking Install Now, your WordPress installation may show a blank page with the message “Are you sure you want to do this?” or fail silently during upload.
Solution A: Wrong Zip File Uploaded
This often happens when attempting to upload the full package instead of the theme file alone. Download the “Installable WordPress file only” package directly from your ThemeForest account (See above image) and re-try the upload.
Solution B: Server Upload Limits Are Too Low
The Goarch theme package may exceed the default file upload size permitted by your hosting server.
- Contact your hosting provider and ask them to increase your
upload_max_filesizeandpost_max_sizesettings to at least 32M. - Alternatively, update your server settings directly by editing your
php.inior.htaccessfile via FTP or cPanel File Manager.
3. Problem: White Screen During or After Installation
If attempting to install or activate your theme results in a blank white screen (often referred to as the “White Screen of Death”), your server is likely running out of allocated PHP memory.
Solution:
Increase your server’s available PHP memory limit:
- Contact Hosting Support: Ask your web host to increase your PHP Memory Limit to 256M.
- Update
wp-config.phpvia FTP: Open your site’s root directory, edit thewp-config.phpfile, and paste the following line right above/* That's all, stop editing! Happy publishing. */:PHPdefine( 'WP_MEMORY_LIMIT', '256M' ); - Host Control Panel: If your host provides a cPanel or management console, adjust the PHP memory allocation under the Select PHP Version > Options or PHP INI Editor section.